Configuring Hyper-V Remote Management
Edit December 2019
Are you looking how to configure Hyper-V remote management with Windows Hyper-V Server 2019, using the hvremote script? Well, you came to the right place!
I’ve just upgraded my Hyper-V virtual lab to Windows Server Hyper-V 2019, using these same instructions, and it worked flawlessly! If you have any doubts or comments regarding the process, please leave them in the comments section below.
Download Windows Hyper-V Server
Edit May 2018
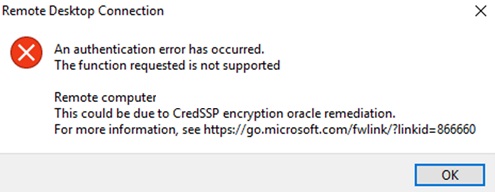
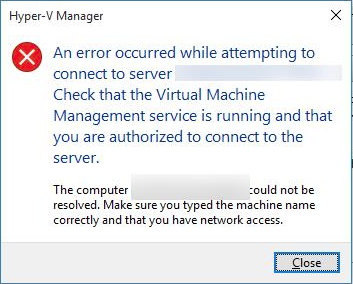
If you installed the Windows 10 May 2018 security updates make sure your Hyper-V server is also up to date or you will be presented with the following messages, the first when connecting to Remote Desktop and the second when connecting to the Hyper-V management console :
References:
Introduction
In this article I’m going to describe how to remotely connect to a Hyper-V server, with both the server and the client computer in a workgroup.
The server is running Microsoft Hyper-V Server 2016 2019, a standalone workgroup install, which you can download from here and the client is a Windows 10 Professional computer.
As strange as it may seem, configuring remote management for Hyper-V is not as easy as installing the server and remotely connecting to it from another computer on the same network using the Hyper-V administrator username and password! As I found out it requires a bit more of work…
Let’s get to it!
Configuring Hyper-V Remote Management
After researching for a while on the internet, I found a very useful video which pointed me in the right direction along with some comments from its viewers. This and a bit of reading on Technet also helped me solve the problem and I’m documenting it here for my future reference, hoping that it will be helpful to the rest of you reading this.
For this article, I’m assuming the Hyper-V server is installed and ready to be configured and that the Hyper-V management tools are installed on the client machine.
Download the HVRemote.wsf script
The first step is to download the HVRemote.wsf script. This script will greatly speed up the whole process of configuring the Hyper-V remote management.
Download it from here. Unfortunately the script cannot be found anymore at the previous location. You’ll have to google for it or you can download a copy directly from here.
Rename the script to .wsf (please note that the file is made available as is and I will not be held responsible for any misuse given to it, i.e., if you use it, it’s your responsibility). Save the script to a thumb drive as we will need it on both the server and the client machine.
Network environment
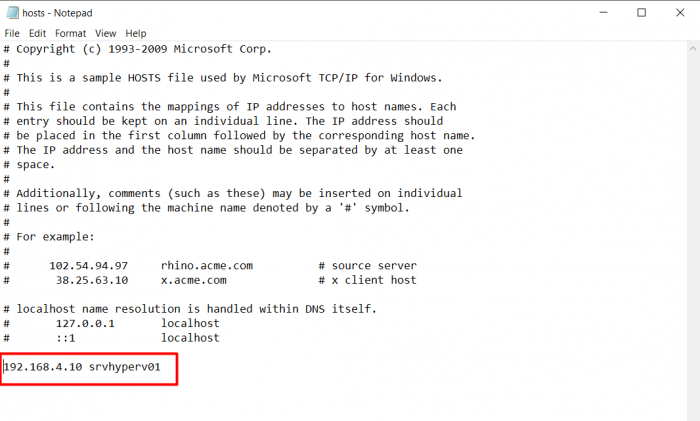
Make sure the client can reach the server by hostname instead of its IP address. This can be achieved by adding an entry to the client’s hosts file. To do so, open the hosts file located in “C:\Windows\System32\drivers\etc“. Add an entry to the end of the file pointing to the Hyper-V server, as shown in the image below.
In my environment the server is called srvhyperv01 and its IP address is 192.168.4.10
Configuring the Hyper-V Server
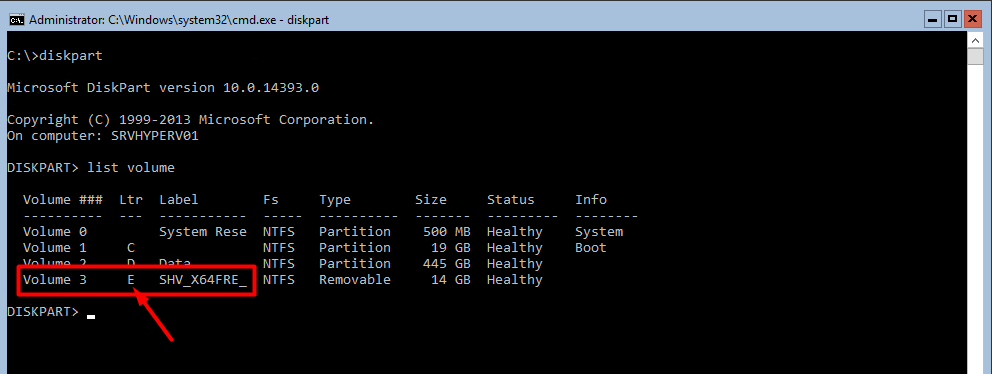
Plug the thumb drive containing the HVRemote.wsf script to the server. At the server’s command prompt, position yourself at the thumb drive root. To know what drive letter has been assigned to your thumb drive, type “Diskpart” and then “list volume”, as the image below shows. As you can see, to my thumb drive was assigned driver letter “E”.
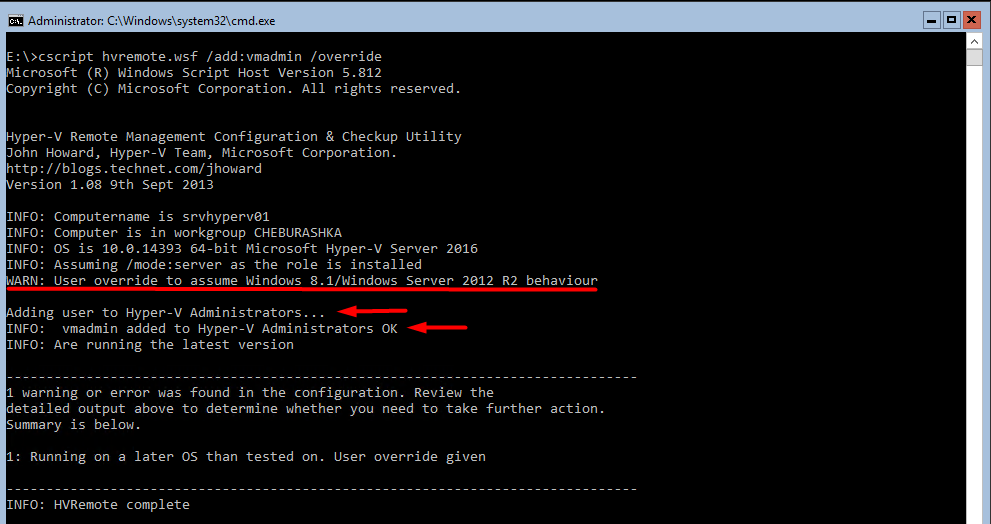
At the root of your thumb drive, type the below (change the username to match your Hyper-V’s administrator username) and press enter.
cscript HVRemote.wsf /add:[user to give access to Hyper-V server] /override
As the script was designed to run under previous versions of Windows Server, use the “/override” switch to prevent the script from checking the OS version and not executing.
The script will now execute and if all goes well, you should get about the same result as the image below. Note that you’ll get a warning because we’re not running the script under Windows 8.1 or Windows Server 2012 R2, and that’s just about it. In the end you get the message that the user was added to Hyper-V Administrators. Let’s move on to the client side.
Configuring the Hyper-V Client
Once again, plug the thumb drive containing the script to the machine you’ll be using as the Hyper-V management client. Open an administrator command prompt and place yourself at the root of the thumb drive. In my case, I’ve downloaded the script to the C: drive of my computer and I’ll be running it from there.
Before executing the script we need to add to the client the credentials that will be used to manage the Hyper-V server. To do that type the below (remember that my user is vmadmin. change it accordingly to your configuration):
cmdkey /add:srvhyperv01 /user:vmadmin /pass
You’ll be prompted for the password. After entering it, the credentials are added successfully, as shown below.
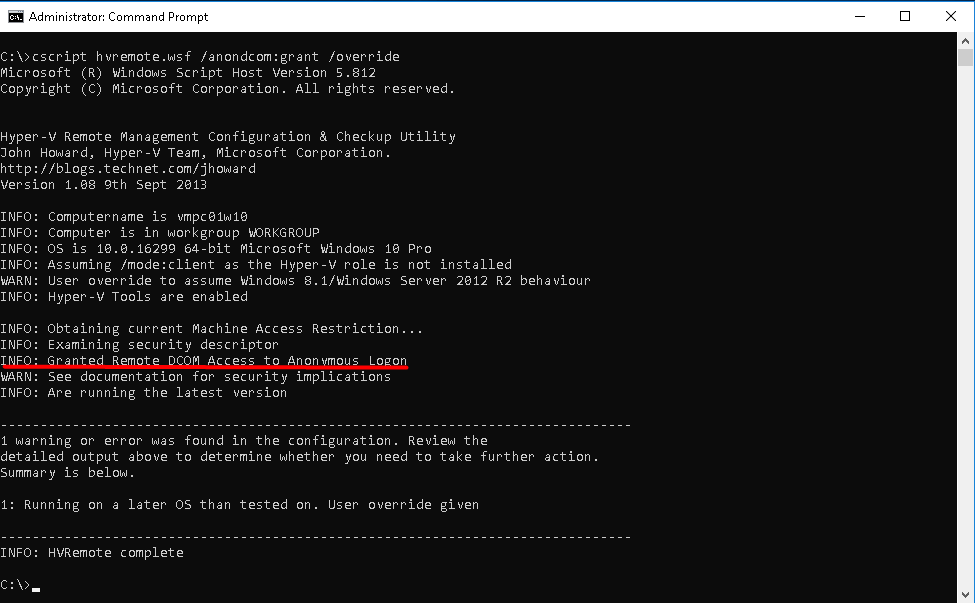
The next thing to do, because both computers are in a workgroup, is to allow DCOM anonymous logon remote access. To do that we will use the script. Type the following at the client computer and press enter.
cscript hvremote.wsf /anondcom:grant /override
The result should be as following:
Now, it’s time to configure WinRM and add the Hyper-V server to the list of WinRM trusted hosts.
For that type winrm quickconfig and press enter. Press “y” at the below message:
And “y” again at the next message:
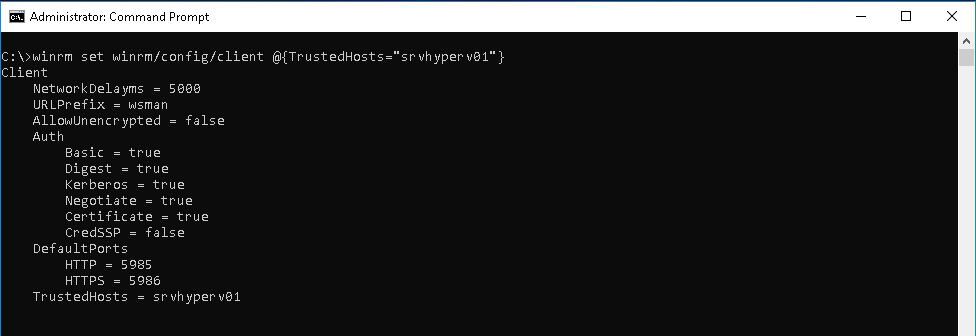
Now that the WinRM service is configured, add the server to the TrustedHosts list. For that type the following:
winrm set winrm/config/client @{TrustedHosts=”[HyperVServerName]“}
The output should be as follow:
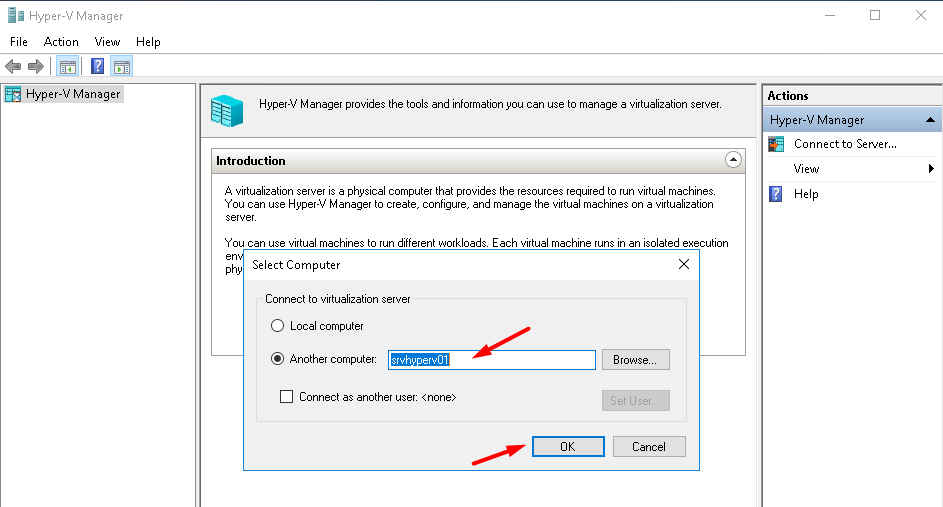
And that should be all! Let’s try to connect to the Hyper-V remote management console. Open the Hyper-V management console and try to connect. Right-click on “Hyper-V Manager” and select “Connect to Server”. Insert the server name and press OK.
Et voilá! We are now connected to the Hyper-V server! We are able to see the already created VMs as we also have full access to the menus!
References:
https://www.youtube.com/watch?v=53xFqRaqSno
https://code.msdn.microsoft.com/windowsdesktop/Hyper-V-Remote-Management-26d127c6
https://technet.microsoft.com/en-us/library/ff700227.aspx
Follow us on Twitter and Youtube:
As always, if you found this article useful, share it with your friends.
If you have any questions or suggestions, please leave your comment.
And… Thank you for reading!









Thanks, I really had a time of it, and these instructions really helped. In my case I got stuck @ quickconfig section, as it said not all of my connections were set to Private. Even though I followed all of Microsoft’s instructions to set it to Private, multiple reboots, etc. It would just error out. I finally deleted all of my VPN and other connections other than my main ethernet connection, and that allowed it to finally complete. The script link is now no longer hosted by Microsoft, and that link is broken, you have to search around for it to find it anymore (1/27/2020)
Hi and thank you for your comment!
I’ll look it up and update the article!
Cheers
To set the profile of a network connection use the following (powershell):
run Get-NetConnectionProfile and take note of the property “Name”.
run Set-NetConnectionProfile -Name “your connection name” -NetworkCategory “Private”
That should do it.
Cheers
Fantastic! Pulling my hair out for too long – thanks! I’ve been trying to set up an Hyper-V in a lab environment before rolling out to client.
Hi Graham,
very happy to be of help!
Cheers
Duuuuude! I love you man!
Taking some classes and decided I’d like to have more “hands-on” experience with Windows Server and Hyper-V, as opposed to the single-lesson labs. Though we’re being taught a variety of configuration settings, especially relating to security, we’ve learned nothing of installation and initial setups. Downloaded Hyper-V 2019, found the video you started with and it was pretty helpful up to the point of the script. Couldn’t find the script. Of course, even if I had, it would not have done me any good since the video is a little outdated in regards to using 2019 instead of 2012.
Your page came up in some search results and guided me right along. Thank you so much!
AHAHAH! And I love you, for reading!
I’m very glad I could help!
Cheers
i have done all the Steps which are mentioned above
but, I’m getting an error while connecting Hyper-V server in Hyper-V management
the Error: “the operation on computer [Server Name] failed”
Hi Suhail,
thank you for reading and for your comment.
Make sure both machines are fully updates and that you have the hosts file duly configured.
Regards,
Pedro
i would like to know,
is Windows 7 Pro x64 supported to manage Hyper-v core 2019 ?
because im trying to manager Hyper-V 2019 Through Windows 7
is that why am i getting Error ?
Hi Suhail,
I couldn’t tell. I haven’t tried with Windows 7, but if you read, in the beginning of the post, the May 2018 update, when I installed the latest updates in my Windows 10, I also had to update the server or I would be prevented from connecting to the Hyper-V console. Maybe you give it a try with Windows 10?
For your reference: https://docs.microsoft.com/en-us/archive/blogs/yongrhee/after-may-2018-security-update-rdp-an-authentication-error-occurred-this-could-be-due-to-credssp-encryption-oracle-remediation
Regards,
Pedro
Hi,
thanks to your post. I have installed hyper v 2012 r2 on a bare metal. trying to follow your step to have hyper v manage on my laptop to connect to the server but always show not resolved.
could you tell me how to get to E: which is USB plugged in server machine please? I’ve tried select disk 1 but never show E drive…
thanks
Also this. If anyone is met with the following error after doing everything as correctly as possible please run the following command on the PC you are trying to connect to your new Hyper-V Server from: [set-item wsman:\localhost\client\trustedhosts -Concatenate -value ‘hostname’]. I was banging my head for a little while before I encountered this fix even though I had already manually edited my host file beforehand in C:\Windows\System32\drivers\etc\hosts, so this must be something different.
>>>Error as described: “The WinRM client cannot process the request. If the authentication scheme is different from Kerberos, or if the client computer is not joined to a domain, then HTTPS transport must be used or the destination machine must be added to the TrustedHosts configuration setting….”
I found this solution on the following SpiceWorks forum. Link here: https://community.spiceworks.com/topic/2268821-winrm-cannot-process-the-request?page=1#entry-8839478
Have a great day!
Hi Janosik,
thank you so much for sharing your findings!
Hi,
did you try managing hyper-V 2019 from other version of server? 2016 or 2019? It is working for me from non domain windows 10pro, but not wokring from windows server 2016 which is rdp as part of other domain. Is there problem is is domain SRV computer or problem is SRV OS?
Thanks.
Hi Vik, sorry for the late reply, but in the post is the solution for Windows Server 2019. Cheers