Create a bootable USB drive Windows Server 2016 (cmd)
Introduction
Today we will look at how to create a bootable USB drive with Windows Server 2016. This is something that I’m using all the time! And not only for Windows Server, but for all versions of Windows since Windows 7 till Windows 10! Yes, you can also create a bootable USB drive with Windows 10, following these instructions! You can either do it manually, as shown below, or using an application called Rufus. Check in this post how to create a bootable USB pen drive with Rufus.
Don’t forget to change the drive letters and disk based on your system configuration, specially when selecting the USB stick as this will clean it and will erase ALL of the existing data!! In my case the USB drive is D: and the disk where the Windows Server 2016 files are is G:.
So, let’s do it!
Create a Windows bootable USB in CMD
Clean the USB pen drive
Open an elevated command prompt. Press the Windows Start button and type cmd. Right-click on “Command Prompt” and choose “Run as Administrator”, as shown below:
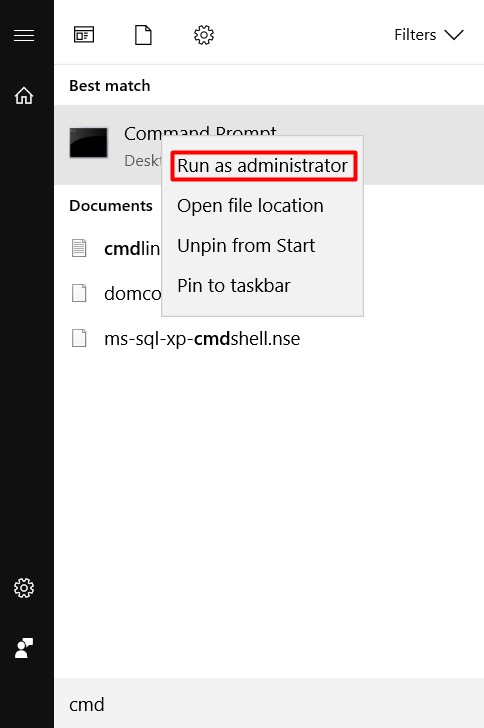
At our command prompt we type “diskpart” and press enter. We should get the DISKPART prompt as bellow.

Type “list disk” to list all the drives available at your computer. As you can see from the screenshot below, my USB stick is Disk 2, which is a 16GB USB stick. Please pay very attention because in the next steps we are going to erase ALL data in the USB stick. You have been warned!

Next step is to select the disk to use. For that we issue the following command: “select disk 2”, as shown below.

Now it’s time to clean the disk! Once again, I warn you that this step will erase ALL data in your USB stick! To clean the disk issue the following command: “clean“. You should get the following message.

The next step is to create a primary partition. Issue the following command: “create partition primary”.

After creating the partition we should mark it active by issuing the following command: “active”.

Now that we have a new partition and it is marked as active, it’s time to format it. Issue the following command: “format fs=ntfs quick label=”winsrv2016″”. The label is whatever label you feel like setting up.

We can now leave diskpart by issuing the command “exit”. After leaving diskpart change directory to where your Windows Server 2016 disk is mounted. In my case is the drive G:

Change directory to “boot” and issue the following command: “bootsect /nt60 d:”, where D: is the drive letter assigned to the USB stick. change it according to your system config.

Now our usb stick is ready to receive the Windows files. To copy the files to your usb stick issue the following command: “xcopy g:\*.* d: /H /F /E”.
The xcopy switches are important and do the following:
/H – Copies hidden and system files also.
/F – Displays full source and destination file names while copying.
/E – Copies directories and sub-directories, including empty ones.

After copying all files, the USB drive is ready to be fired up at any machine machine you’d like to boot it with.
If you have any suggestions or improvements, please leave a comment.
If you liked this article please feel free to share it with your friends.





Existing without the answers to the difficulties you’ve sorted out through this guide is a critical case, as well as the kind which could have badly affected my entire career if I had not discovered your website.
I’ve read several articles now that make this sound so easy but I’ve been pulling my hair out because I can’t mark the new partition on the USB key as “active” which is causing to not be bootable. Any thoughts? I’m running the latest build of Windows 10 Pro, using elevated permissions. Everything else goes fine, but when I type “active” it says:
DISKPART> active
The selected disk is not a fixed MBR disk.
The ACTIVE command can only be used on fixed MBR disks.
DISKPART>
Hi John,
thank you for your comment.
Try this: https://neosmart.net/wiki/convert-gpt-to-mbr/ and let me know!
Regards
Pingback:Instalar o Windows Server 2016 - ExperiencingIT