Create Windows Server 2019 bootable USB (Rufus)
Introduction
In a previous article, I created a Windows Server bootable USB using the command line.
This time I will use a small application called Rufus that does all the hard work for you, though, from my experience, it’s a bit slower copying files to the USB stick.
Just a side note: with this app you can not only create Windows USB bootable thumb drives but you can also use it to create Linux bootable USB thumb drives.
So, let’s start!
Create a Windows Server 2016 2019 Bootable USB
Before starting
Download Rufus latest version from the Rufus official website and save it to your computer. It’s a single file application, so no installation needed. Just run it!
Have your Windows ISO file ready as we’re going to need it later on, to “burn” it onto the USB stick. For this note, I’m using a Windows Server 2016 2019 ISO that I downloaded from Microsoft.
Burning the ISO with Rufus
Please remember:
Rufus will clean your USB stick and delete all the data in it!!
I will not be responsible if you erase all your data if you select the wrong disk!
From the application main screen select the drive you want to use. In my configuration it’s drive D:
I believe the minimum USB size for creating the boot disk are 8GB, but nowadays, the best option is to get a 16GB or 32GB USB stick.
Do not fill the rest of the options because Rufus will fill them automatically when we select the ISO image.
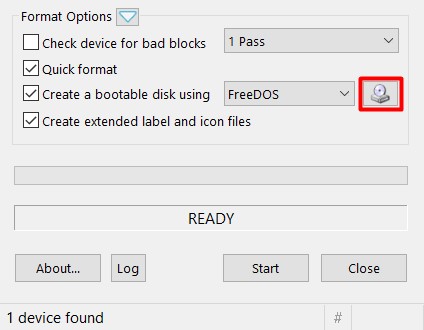
Let’s choose now the Windows Server 2016 2019 ISO image that has been previously downloaded. For that press the button shown below:
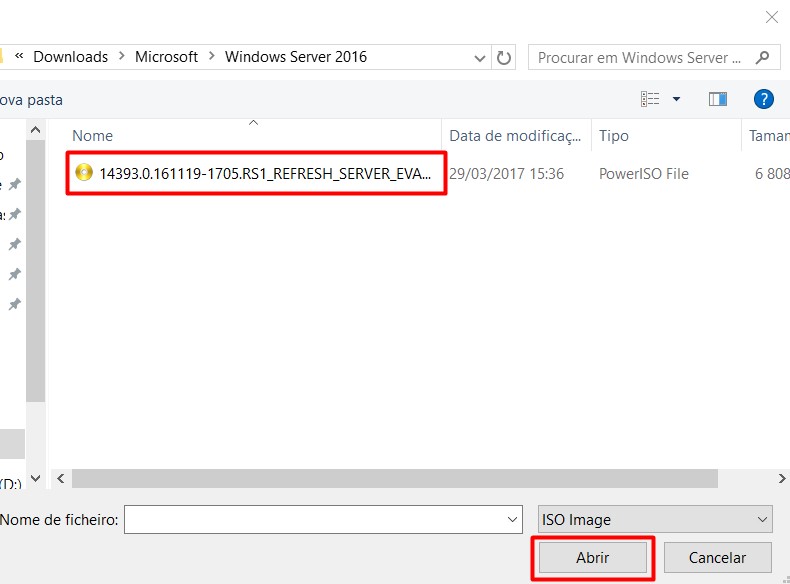
Browse to the path where you saved the ISO image, select it and press “Open” (sorry for the Portuguese “Abrir”):
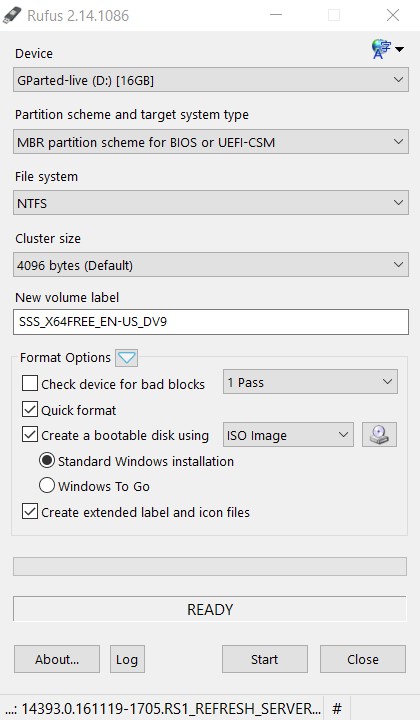
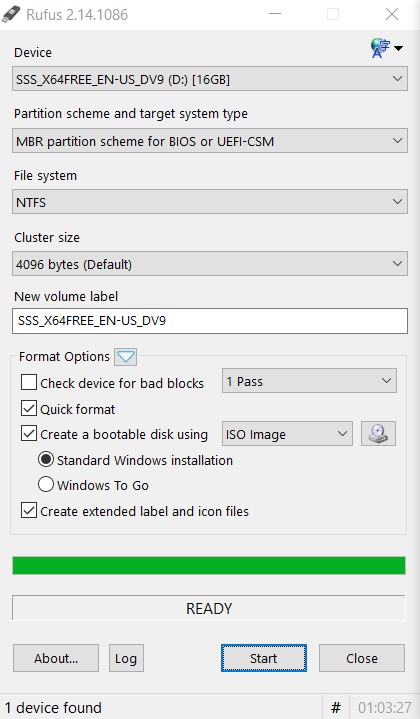
As you can see the “Create a bootable disk using” changed from “FreeDos” to “ISO Image”, and all the previous options are automatically selected, label filled and two new options showed up:
- Standard Windows installation
- Windows To Go
We’ll use the 1st option: “Standard Windows installation”. The second option is used to create a Windows To Go USB stick, from which you can boot Windows directly from the USB drive. I have never tried this option. If any of you fancy giving it a go let me know in the comments! Read more about it here: https://en.wikipedia.org/wiki/Windows_To_Go
Your Rufus should look like this, where, again, the drive letter should reflect the drive letter assigned by your computer to your USB stick!
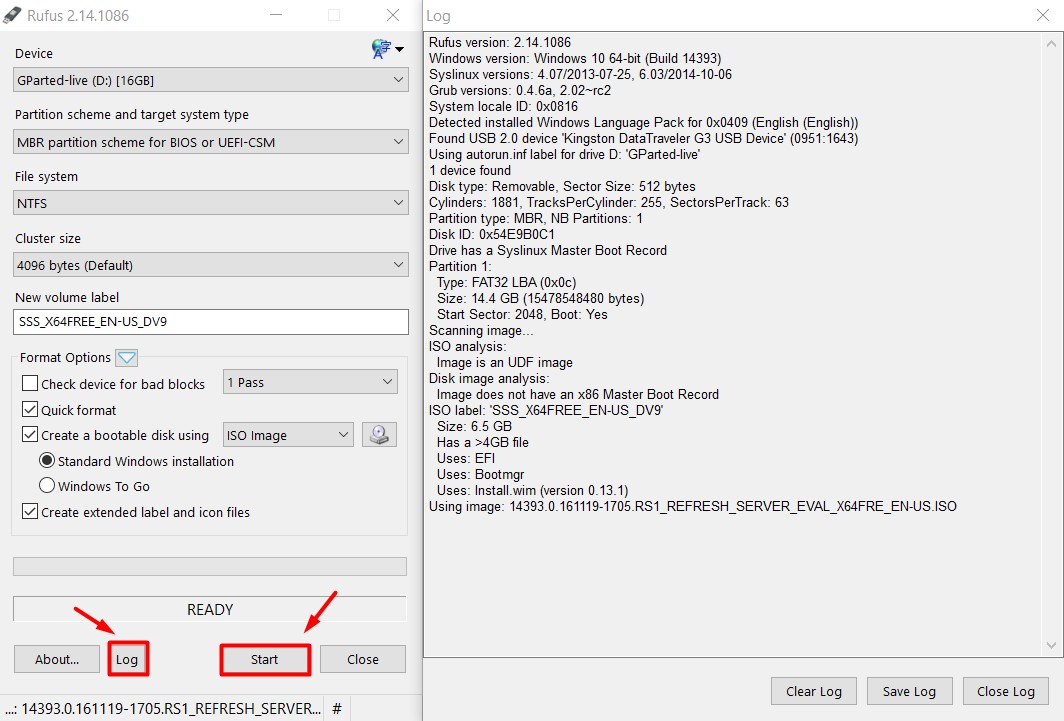
If you’d like to watch what is going on just press the “Log” button and new window will pop-up, as shown below. Press the “Start” button to start the process of creating the USB stick.
Testing
After completed, plug the USB to any computer you’d like to start it with and, if your BIOS settings are properly set-up, the computer will directly boot to the Windows Server 2016 installation screen.
As always, if you have any suggestions or improvements, please leave a comment.
If you liked this article please feel free to share it with your friends.
And… Thank you for reading!






thanks
Thank YOU for reading!
Good stuff right here. Had to do this so I could start working on a WDS
Thank you! And thank you for reading!
For some reason when I go to the iso location, it does not show up. It’s an iso archive and I unzipped it as well and it still doesn’t show up. Any tips?
Hi KEv and thank you for your comment!
Where are you downloading the ISO from? I’m asking you that because downloading from Microsoft’s website the file already comes in ISO format and you don’t need to unzip it anywhere.
Let me know if you have further doubts.
Cheers!
Thank you works nicely for Windows Server 2019
Glad it helped you!
Cheers!
Thanks for your good work.
Most appreciated.
Hi Julious,
Thank you!
Pingback:Instalar o Windows Server 2016 - ExperiencingIT
thanks! great soft.
Thanks for the article! Very easy to follow! Quick question if you don’t mind: does using NTFS or exFAT matter for this process? Other, more involved tutorials I’ve seen recommended using FAT32 or exFAT, so idk if it really matters, or if Rufus will be able to make its bootloader regardless?
Hi,
I’ve done this quite a long time ago, but I believe Rufus automatically switches to FAT32, as you can see on the log screenshot. It says Partition 1: Type: FAT32.
I hope this answers your question 🙂
Cheers