LAN Routing and NAT with Windows Server 2016
Introduction
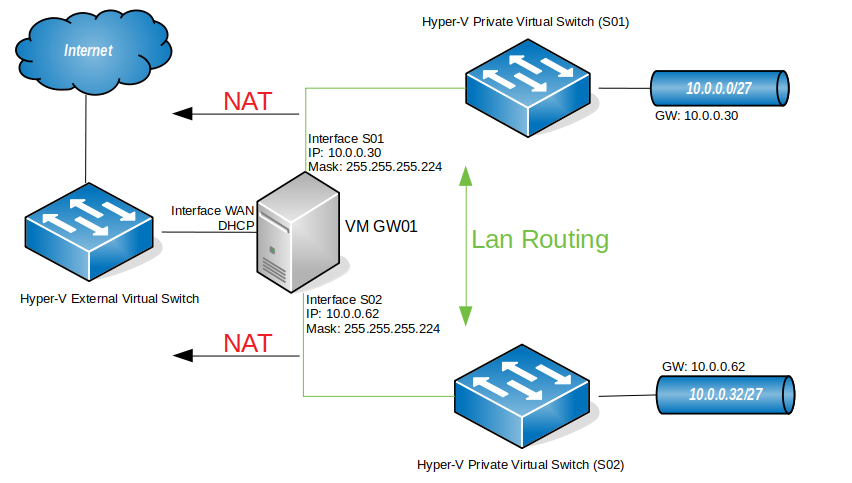
In this article I’m setting up a 3 way router with Windows Server 2016, which will be performing LAN routing between two subnets and NAT for both subnets. This setup will replace the gateway I had in my Hyper-V virtual lab. So, basically, I needed to add a new subnet to my virtual lab (10.0.0.32/27) and I needed both subnets to communicate and both to have internet access. I could have done this by adding a router between both subnets, but for that I would need to add a new virtual machine, which would be consuming additional resources from my Hyper-V server. This way, I’ll have a solution that will grow with the virtual lab. In case I need to add a new subnet to the lab, I just have to add a new interface to the router and all subnets will be automatically routed between each other. Perfect!
| If you are looking to set up a simple NAT router with Windows Server 2016, with one subnet and an internet connection, please read this article instead: https://www.experiencingit.net/windows/windows-server-2016-nat-router/ |
My virtual lab
| Please note that this is my virtual lab configuration. You will have to configure the router to match your own network config, but, if you are reading this, I assume you already know that. Also, DNS servers are not in place here. After configuring the router, your client PCs will need to have a DNS server configured – usually your internet router – so that they will be able to browse the internet. Again, if you are reading this article I assume you have a basic understanding how these things work. |
Let’s start
First things first
You will need a machine with Windows Server 2016 installed, for which you can find a guide here, with three network cards attached to it, as per the diagram above.
Adding the Remote Access role
- Open “Server Manager”. Click on the start button and find “Server Manager”.
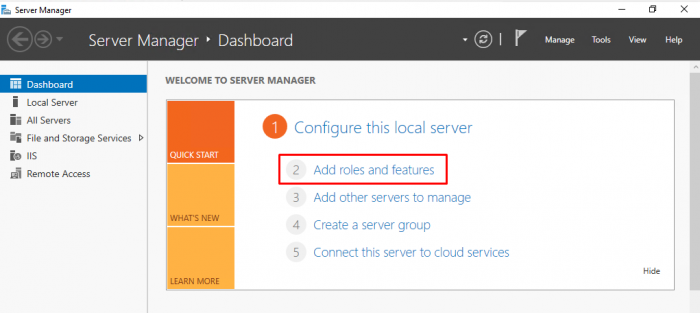
- Click on “Add roles and features”.
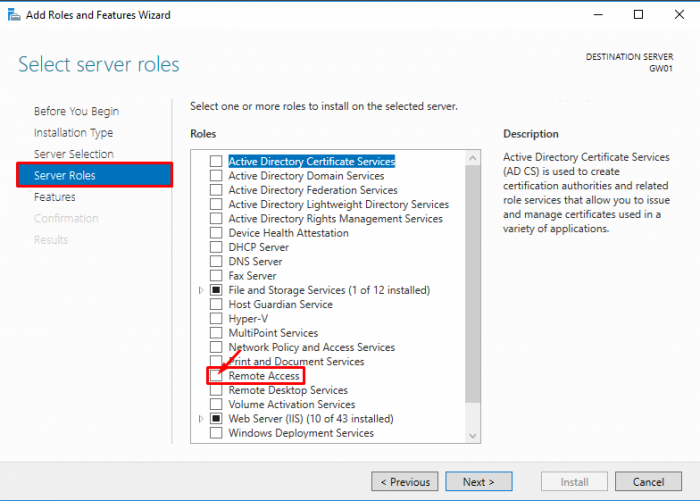
- Click “Next” until you reach the “Select server roles” window. Check the “Remote Access” box and click “Next”.
| NOTE: If you get the message below when adding the “Remote Access” role, just press the “Previous” button and “Next” again, and try again adding the role. This should make that message go away. |
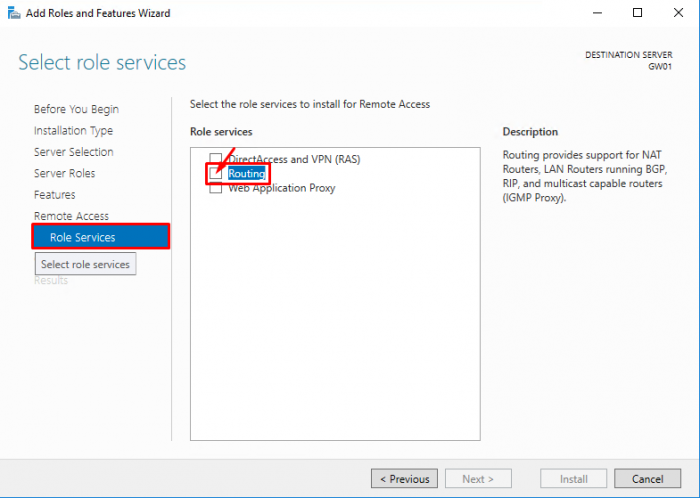
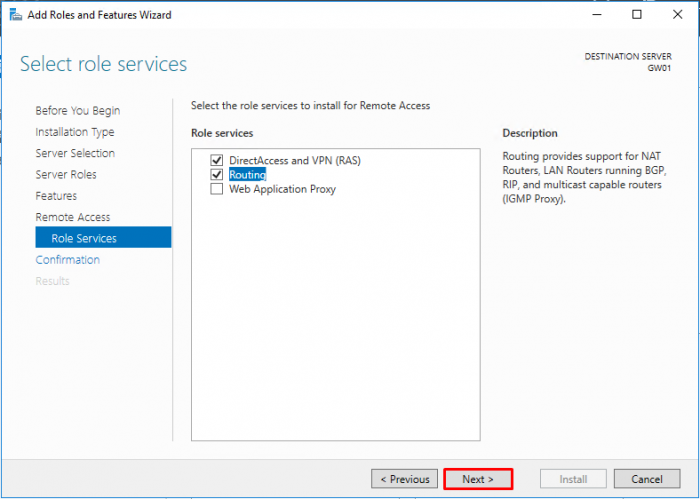
- Click “Next” until you reach the “Select role services” window.
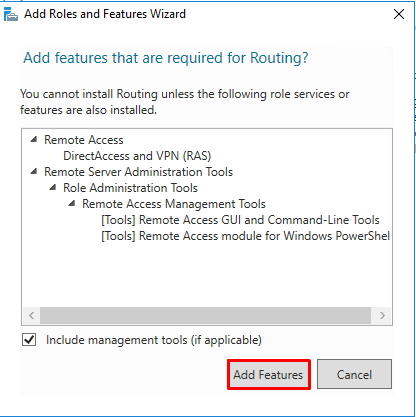
- Select “Routing”
- Click on “Add Features”
- Note that “DirectAccess and VPN (RAS)” are selected by default. No need to make any changes. Press “Next”.
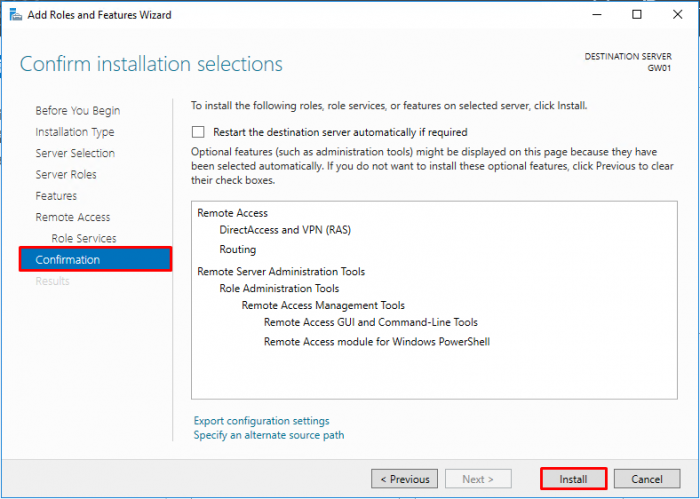
- Click on “Install” on the “Confirmation” window and wait for the role to be installed.
Configuring the Remote Access Role
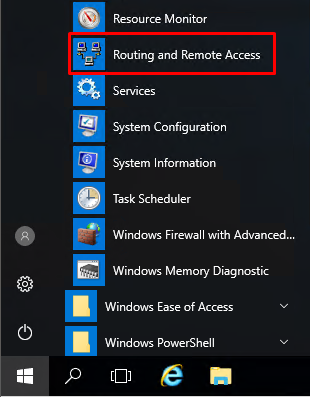
- Press the “Start” button and find the “Routing and Remote Access” console. Open it.
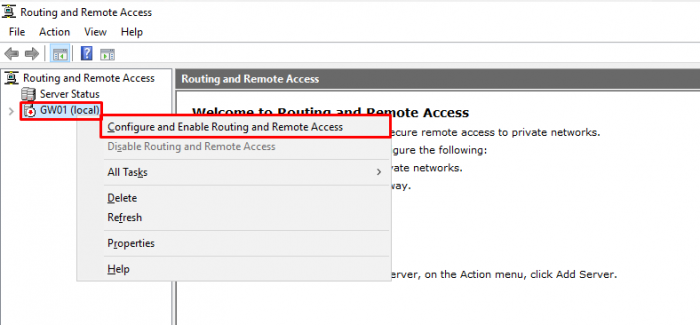
- Right-click on the (local) server and select “Configure and Enable Routing and Remote Access”
- Press “Next” at the welcome window of the “Routing and Remote Access Server Setup Wizard”.
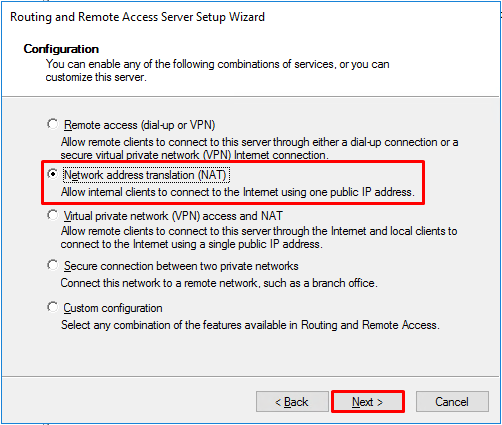
- On the “Configuration” window, select “Network address translation (NAT)” and press “Next”.
- Select the public interface that you are using to connect to the internet. Press “Next”.
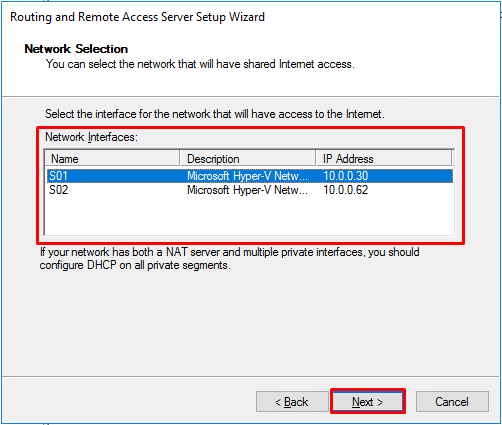
- Select the interface that will have access to internet. Select the first interface and press “Next”. We’ll deal with the second interface later.
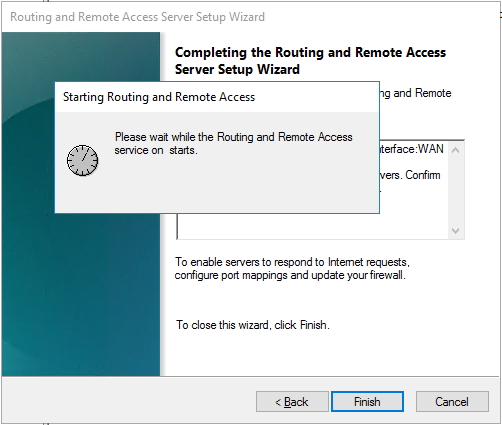
- Click on “Finish” to close the setup wizard. If a pop-up window comes up warning about firewall ports for VPN connections, you can safely ignore this warning as we are not setting up any VPN access. Just press “OK” and wait for the “Routing and Remote” access service to start.
Adding the second NAT interface
So, during the Routing and Remote Access setup wizard, we’ve configured NAT for one of the subnets, but if we want (and we do!) to provide internet access to another subnet, we must configure NAT for the second (n) interface.
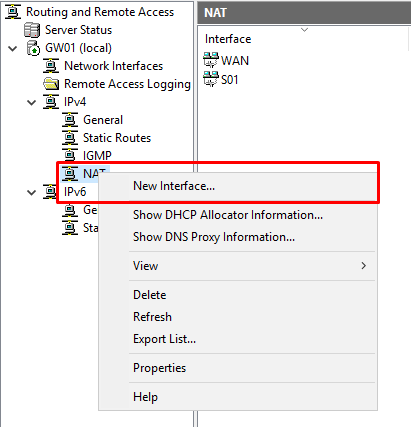
- On the “Routing and Remote Access” console, under IPv4, right-click “NAT” and select “New Interface…”
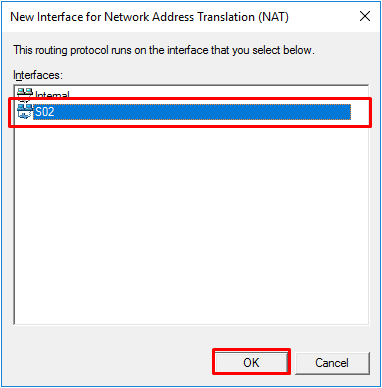
- Select the interface for the second subnet and press “OK”.
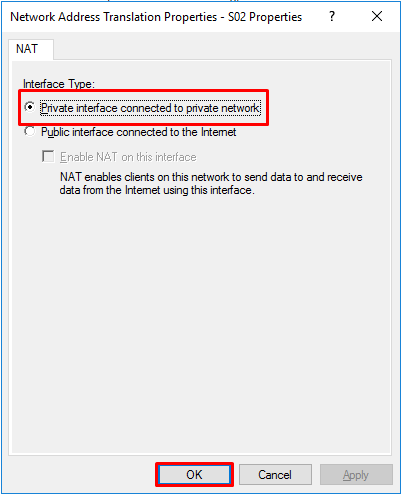
- Select “Private interface connected to private network” and click “OK”
And this ends setting up the server. Now it’s time to test if all is working as it should!
Checking the configuration
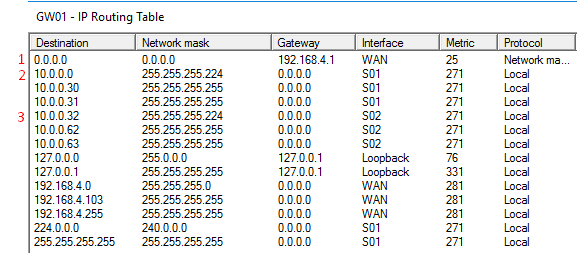
In the “Routing and Remote Access” console, under IPv4, right-click “Static Routes” and choose “Show IP Routing Table…”. A new window, with the known routes to this computer, will pop-up. Analyzing that window (please always remember that this IP Routing table is regarding my setup, which is the one described in the diagram on the top of the page), you will see that we have:
1 – A gateway! All traffic that the router doesn’t know where to direct it, will direct it to the gateway.
2- Traffic for the network (subnet) 10.0.0.0 with a netmask of 255.255.255.224 (/27) will be directed to the interface S01, which is the interface connected to that subnet.
3- Traffic for the network 10.0.0.32 with a netmask of 255.255.255.224 will be directed to the interface S02, which is the interface connected to that subnet.
Testing the LAN Routing and NAT
NOTE: for all to work properly, ideally you should have a DHCP assigning IP addresses on each subnet and also a DNS server for your client computers to be able to resolve names and browse the internet.
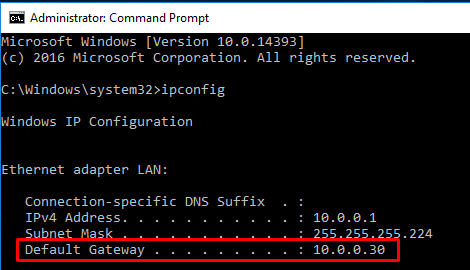
Having said that, from one of the computer clients connected to S01, you should be able to ping S02. This is the IP config I have at one of my servers in S01. You’ll see that the gateway for this subnet is the IP of the router (10.0.0.30).
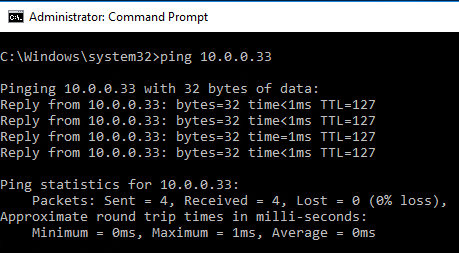
If you ping an IP address in the S02 subnet, this should be the result:
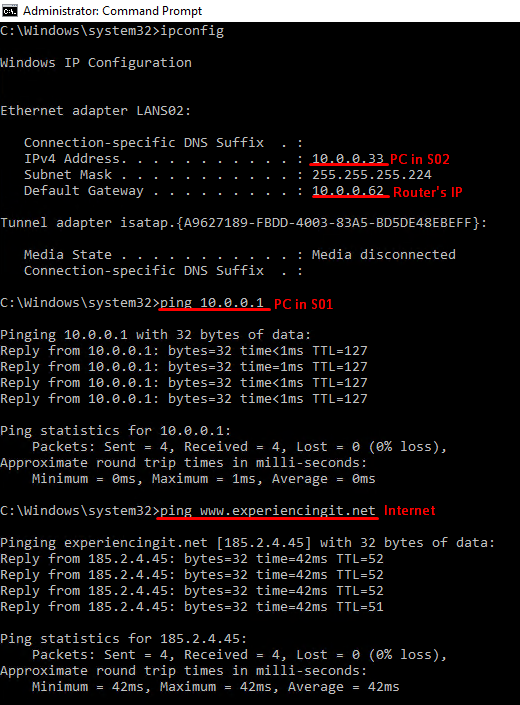
And if you try and browse the internet, voilá!
And the sames goes from a computer on subnet S02:
If you run into any issues, ie, not pinging from one subnet to the other, disable the router firewall and try again. That should do it. Or, instead of disabling the firewall completely, add – or enable – rules to allow traffic between both subnets. In my case, I disabled the firewall completely because this is a lab environment, with no direct connection to the internet.
As always, if you found this article useful, share it with your friends.
If you have any questions or suggestions, please leave your comment.
And… Thank you for reading!






Pingback:Install SCCM Current Branch - Part 1 - SCCM Lab Setup – ExperiencingIT
Pingback:Setup Windows Server 2016 as a NAT Router – ExperiencingIT
I have setup the same in windows server 2016. all the settings are fine.
I have two different forests
abc.local and xyz.local
abc has 192.168.0.0 IP range
Xyz has 10.10.10.0 range..
the scenario is when i ping from any abc forest machine to xyz machine it pings fine and so is the case from xyz to abc all good.
the router machine has three network cards one external which is internet facing and other two are both for abc and xyz forest respectively.
router machine is able to open and ping internet websites
but none of the machines in abc or xyz forests are able to ping internet websites. on the contrary when i ping google.com from abc or xyz forest windows 7 machines it does not ping but if i ping IP address of google it is pinging absolutely fine. this has baffled me completely. i dont know why is this happening also web browser is not able to open internet website neither by IP address nor by website name. but internet is fine in router machine and its flawless. Please help
Hi Sorabh,
thank you for reading and leaving your comment.
What are your network configurations both on the servers and the client machines?
Best regards,
Pedro
Hey, in order for it to work, you need to add forwarders in your DNS server – set it to forward google DNS servers for example 8.8.8.8 and 8.8.4.4.
Your problem occurs because you redirect the traffic of your LAN clients to your gateway. The client needs to know which IP stands behind the URL and if you didn’t add forwarders in the DNS server then it will be unable to find the IP with whom it wants to contact.
Add a DNS role for your server, then: DNS Manager -> Right click on the servername.domain -> Properties -> Forwarders -> Edit -> Type in the IP of google’s DNS IP’s and hit Apply to all… then it should work.
Hi,
I followed your article to installed RRAS on server 2016 on a standalone physical computer with 2 NICs (internal NIC static IP 10.0.0.1 and external NIC IP 192.168.0.178 which connect to my home’s router (192.168.0.1).
I configured “Custom configuration–>Lan routing” service only, the service started normally. However the router seems doesn’t works. I can ping between two NICs (“ping -S 10.0.0.1 192.168.0.178” successful and “ping -S 192.168.0.178 10.0.0.1” also successful) but “ping -S 10.0.0.1 192.168.0.1” failed.
If I configure NAT instead of “Lan routing”, I can successfully ping internet from 10.0.0.1.
In addition, “ping -S 192.168.0.178 192.168.0.1” without issue.
Any suggestions are appreciated!
Thank you.